Democratic Underground Latest Greatest Lobby Journals Search Options Help Login
Google

My brown paper floor: pictures!

Printer-friendly format Printer-friendly format
Printer-friendly format Email this thread to a friend
Printer-friendly format Bookmark this thread
Home » Discuss » DU Groups » Home & Family » DIY & Home Improvement Group Donate to DU
 
Dora Donating Member (1000+ posts) Send PM | Profile | Ignore Mon Apr-23-07 10:43 AM
Original message
My brown paper floor: pictures!


Refresh | 0 Recommendations Printer Friendly | Permalink | Reply | Top
Whoa_Nelly Donating Member (1000+ posts) Send PM | Profile | Ignore Mon Apr-23-07 11:48 AM
Response to Original message
1. Wow! Great job!
Can you share your step-by-step adventure?

And please don't leave out **mistakes**. Would like to know how it all went, what you learned, and how you got to the end result! :hi:
Printer Friendly | Permalink | Reply | Top
 
Dora Donating Member (1000+ posts) Send PM | Profile | Ignore Mon Apr-23-07 01:47 PM
Response to Reply #1
2. First you tear your paper. Then you tear some more.
I already had a roll of brown paper from Home Depot (paint and supplies section), it cost $10. I tore and tore and tore. As I tore, I separated the pieces with a straight edge (paper selvedge) from the pieces with all-torn edges - keeping them in separate garbage bags.

After I tore a bunch of paper (I had four bags stuffed), I roughly wadded and wrinkled the paper inside the bags. Some pieces were wrinkled, others remained smooth.

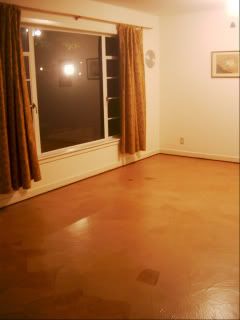
We had already torn the carpet out of our living room and cleaned the concrete. All I did to prep was sweep and then vaccuum before starting to glue the paper down.

Using water-based polyurethane and a roller, I:
1) rolled some poly onto the concrete
2) put a piece (or three) onto the wet poly
3) rolled some more poly onto the paper
4) flipped the paper over and rolled it with poly again
5) smoothed out any air bubbles from under the paper with my hands (I wore disposable gloves)

I started at the edges and worked my way in, working slowly from one side of the room to the other (finishing in a doorway, I didn't want to glue myself into a corner).

After you've covered your entire area, then you'll have to apply as many topcoats of poly as you can stand. We only did 3-4 coats, but I wish we had the time and the poly to do 7-8 coats


LESSONS LEARNED....

Try to do this in one day. I did this room in five sections over the course of 5-6 days. The outdoor humidity varied each time, and I can see the difference in different sections. It seemed to have an effect on how much poly the paper would absorb. Some areas came out darker, and some came out lighter.

If you're working with a partner, make sure you're both using the same methods of glueing the paper down. My husband did a section, and he used all BIG pieces of paper, with a much more generous helping of poly than I had been using. His section looks different from the one I had been working on. This variation doesn't bother us. It looks natural, but others may want more consistency in their results.

Buy your poly by the five gallon bucket. Otherwise you'll run out - again, and again, and again.

I'll consider using oil-based poly for the topcoats if I ever try this again.

TEAR BIG. The smaller your pieces of paper, the greater the number of pieces you'll have to glue down. Bigger pieces means less handling, less labor.

Dispose of your gloves frequently and don new ones. Otherwise, they will shed flakes of dried poly into the wet poly as you're working. AGH.

You do not have to wrinkle the paper in order to glue it down and have it look very nice. But if you do, it will absorb more poly in the creases, resulting in a streakier, marbled affect.

You may miss a spot here or there. Just go ahead and glue down another piece of paper, but use a roller. I used a paint brush for all my patches, and the bristles on the brush actually roughed up the surface of the paper - resulting in a patch that looks darker than the rest.


I looked at these websites for tips and courage....
http://rubyglen.com/crafts/leatherfloor.htm
http://my.enom.com/9711/page99.htm

Googled terms: brown paper bagging bag floor floors
Printer Friendly | Permalink | Reply | Top
 
Whoa_Nelly Donating Member (1000+ posts) Send PM | Profile | Ignore Tue Apr-24-07 10:10 AM
Response to Reply #2
7. A very ambitious project
Thanks for the details! Am bookmarking for future reference if needed. Your description and what you learned along the way is great info to have.


Again...it looks great! WTG! :bounce:
Printer Friendly | Permalink | Reply | Top
 
Stinky The Clown Donating Member (1000+ posts) Send PM | Profile | Ignore Mon Apr-23-07 02:31 PM
Response to Original message
3. I'm impressed!
I started a thread about this very thing a few months ago! But you actually did it! I think it looks great!
Printer Friendly | Permalink | Reply | Top
 
Dora Donating Member (1000+ posts) Send PM | Profile | Ignore Mon Apr-23-07 02:46 PM
Response to Reply #3
4. Your thread inspired me!
I love the result. It's a super and cheap fix for an ugly floor. Did I mention cheap?

We've been readying our home for market the best we can, but didn't have the money for even $1 per s.f. options. This was just the ticket.

Thanks for posting, way back!
Printer Friendly | Permalink | Reply | Top
 
NMDemDist2 Donating Member (1000+ posts) Send PM | Profile | Ignore Mon Apr-23-07 09:42 PM
Response to Original message
5. awesome job Dora!
and your house looks good and ready to sell eh?
Printer Friendly | Permalink | Reply | Top
 
Dora Donating Member (1000+ posts) Send PM | Profile | Ignore Mon Apr-23-07 10:56 PM
Response to Reply #5
6. Eh.
:rofl:

But thanks, I am proud of the floor!
Printer Friendly | Permalink | Reply | Top
 
tabasco Donating Member (1000+ posts) Send PM | Profile | Ignore Sat May-05-07 06:27 PM
Response to Original message
8. Very nice!
I would think the different looking portions only adds to the appeal.
Printer Friendly | Permalink | Reply | Top
 
LibraLiz1973 Donating Member (1000+ posts) Send PM | Profile | Ignore Mon Sep-17-07 07:00 PM
Response to Original message
9. That floor looks amazing!!
Did you ever sell the house?
Printer Friendly | Permalink | Reply | Top
 
Dora Donating Member (1000+ posts) Send PM | Profile | Ignore Tue Sep-18-07 09:40 AM
Response to Reply #9
10. Thank you, and yes we did, in less than a week on market.
The house was in a neighborhood that had recently become pretty hot, so we were lucky. Not all of Austin is moving so quickly.
Printer Friendly | Permalink | Reply | Top
 
NMDemDist2 Donating Member (1000+ posts) Send PM | Profile | Ignore Tue Sep-18-07 03:39 PM
Response to Reply #10
11. well done! for top dollar too I hope! n/t
Printer Friendly | Permalink | Reply | Top
 
blondie58 Donating Member (1000+ posts) Send PM | Profile | Ignore Wed Oct-10-07 07:58 PM
Response to Original message
12. as usual, I am late to the party, but I hope
fashionably so! This is so cool, you did a great job. I was at a restaurant last week with paper flooring. It looked so cool,so its got me thinking. Do you have any idea how it is for bathroom floors?

Thanks- and bookmarked for possible future project.
Printer Friendly | Permalink | Reply | Top
 
Dora Donating Member (1000+ posts) Send PM | Profile | Ignore Mon Oct-15-07 11:21 AM
Response to Reply #12
14. I would consider this a "temporary" floor.
I have no idea how this would perform under a bathroom's conditions. I would think it's not the best - seeing as it's paper, and highly absorbent. A scratch or gouge through the poly would expose the paper underneath to a lot of humidity. But you could always just patch it with another piece of paper and more poly.

If you just want something to cover the concrete until you can put something more durable in later, it certainly wouldn't hurt anything.
Printer Friendly | Permalink | Reply | Top
 
Dover Donating Member (1000+ posts) Send PM | Profile | Ignore Sun Oct-14-07 11:17 PM
Response to Original message
13. That is so inspiring! Did the new buyer comment on this floor?
Surely they were curious.

Are you moving out of state? The Austin real estate market is still very healthy.
Printer Friendly | Permalink | Reply | Top
 
Dora Donating Member (1000+ posts) Send PM | Profile | Ignore Mon Oct-15-07 11:25 AM
Response to Reply #13
15. I don't know what the buyer thought of it, but we had good feedback.
Many lookers were impressed and had a lot of questions about the what it was and how we did it - and one agent pivoted all her weight on her stiletto heel as she was talking to us and left a nickle sized tear in it. We were aghast :eyes:

We're still in Austin. We love it here, and we found a house and yard that was just perfect for us in every way. I can't help but laugh about what the last year was like - I don't know if you were around in the astrology forum last fall when I was posting about the "dream" house we found even then. This house is Just Like that one in so many ways, except better. :-)
Printer Friendly | Permalink | Reply | Top
 
DU AdBot (1000+ posts) Click to send private message to this author Click to view 
this author's profile Click to add 
this author to your buddy list Click to add 
this author to your Ignore list Fri May 03rd 2024, 05:03 AM
Response to Original message
Advertisements [?]
 Top

Home » Discuss » DU Groups » Home & Family » DIY & Home Improvement Group Donate to DU

Powered by DCForum+ Version 1.1 Copyright 1997-2002 DCScripts.com
Software has been extensively modified by the DU administrators


Important Notices: By participating on this discussion board, visitors agree to abide by the rules outlined on our Rules page. Messages posted on the Democratic Underground Discussion Forums are the opinions of the individuals who post them, and do not necessarily represent the opinions of Democratic Underground, LLC.

Home  |  Discussion Forums  |  Journals |  Store  |  Donate

About DU  |  Contact Us  |  Privacy Policy

Got a message for Democratic Underground? Click here to send us a message.

© 2001 - 2011 Democratic Underground, LLC