The DU Lounge
Related: Culture Forums, Support ForumsHere's some proof that I don't just smoke weed and post nonsense and horseshit all day.
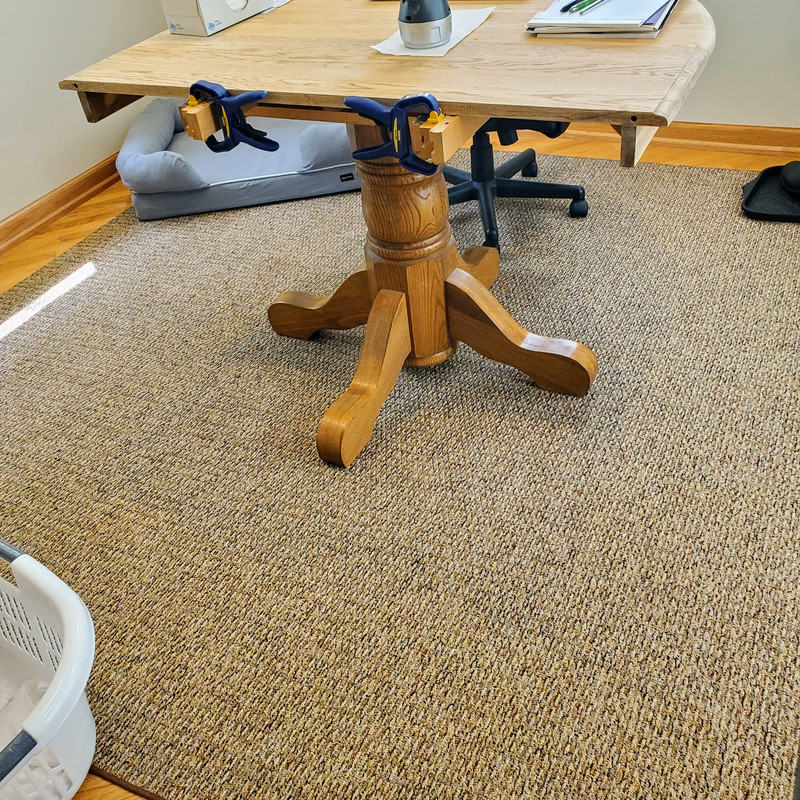
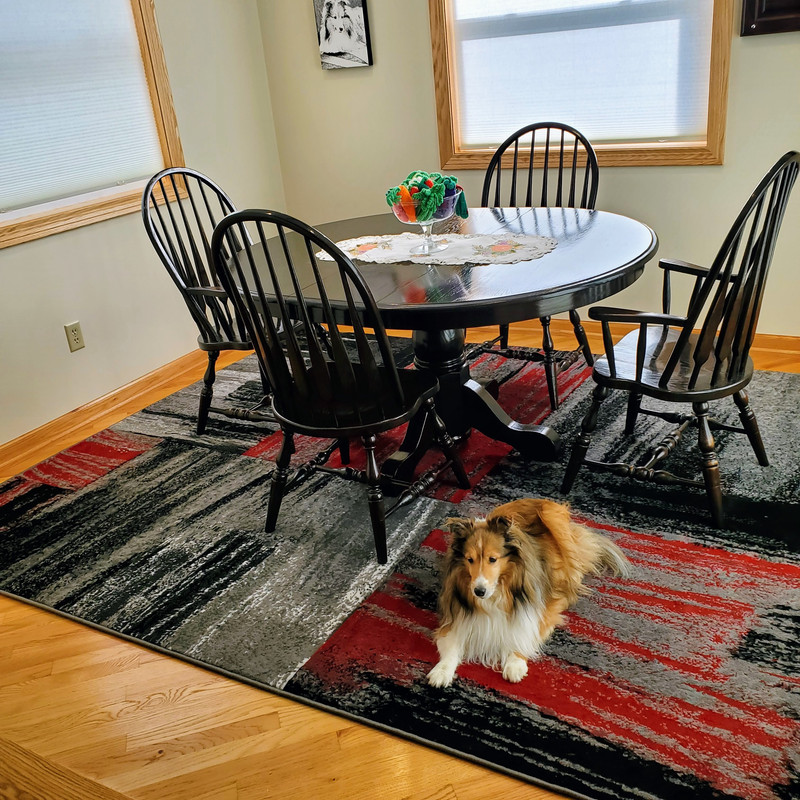
Finally finished this bastard after 17 months (mainly due to having to take long breaks because of cold temperatures in my garage shop).
I've posted my progress on this dining room set re-finish before, figured I'd post the finished product now.
Before and after pics follow. This was a terribly difficult project due several reasons that I won't bore you with. Now that this is complete, I'm never going to do anything else. Ever again.
BEFORE
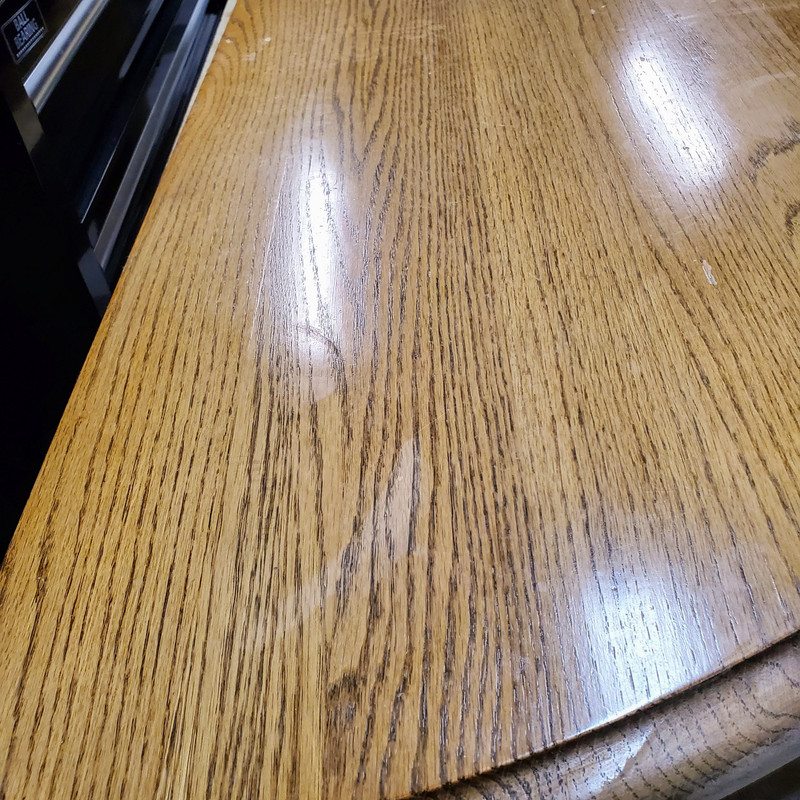
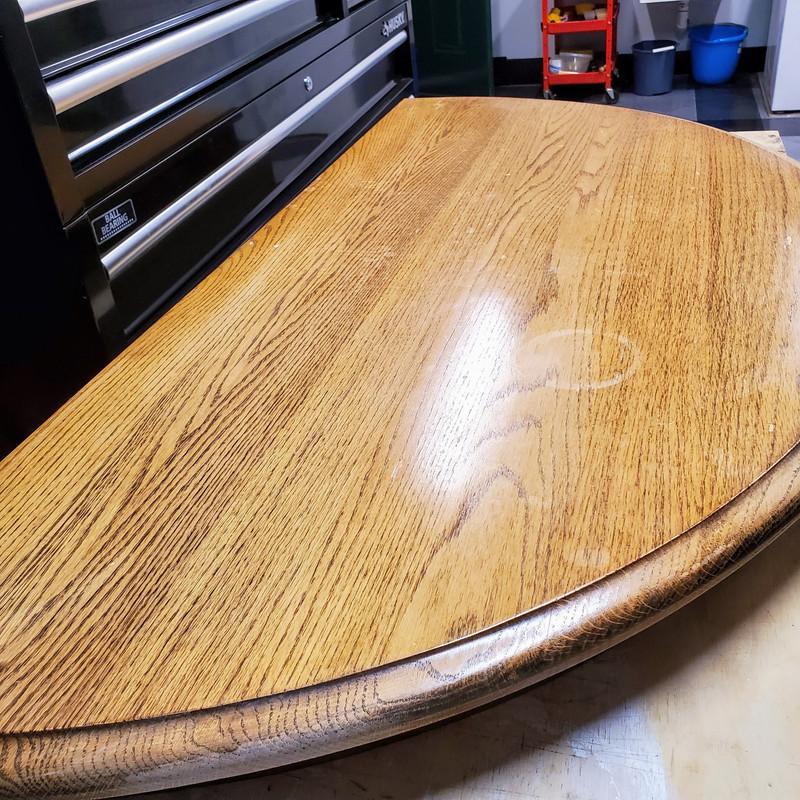
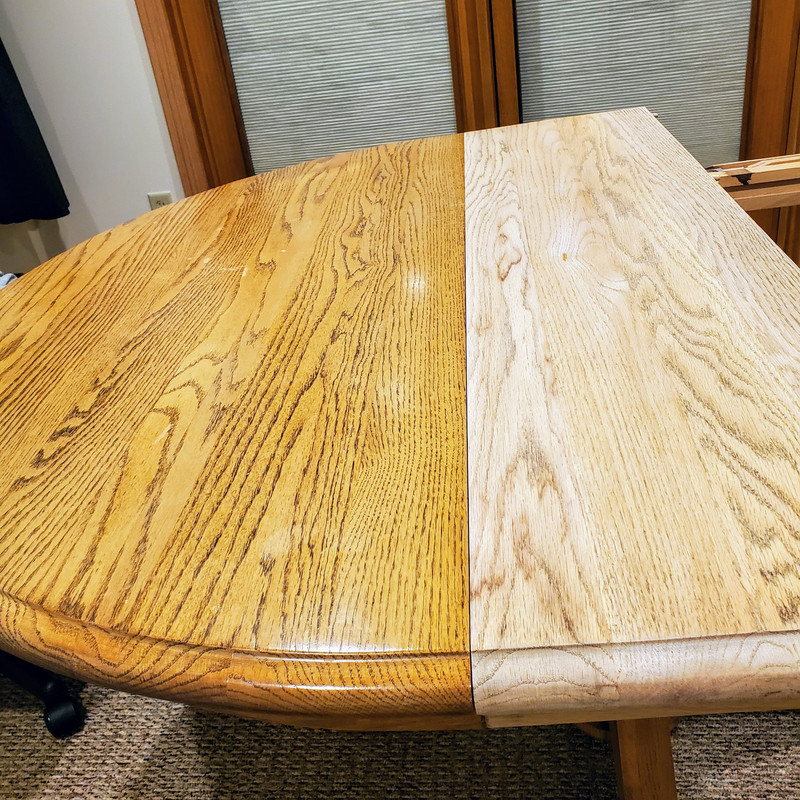
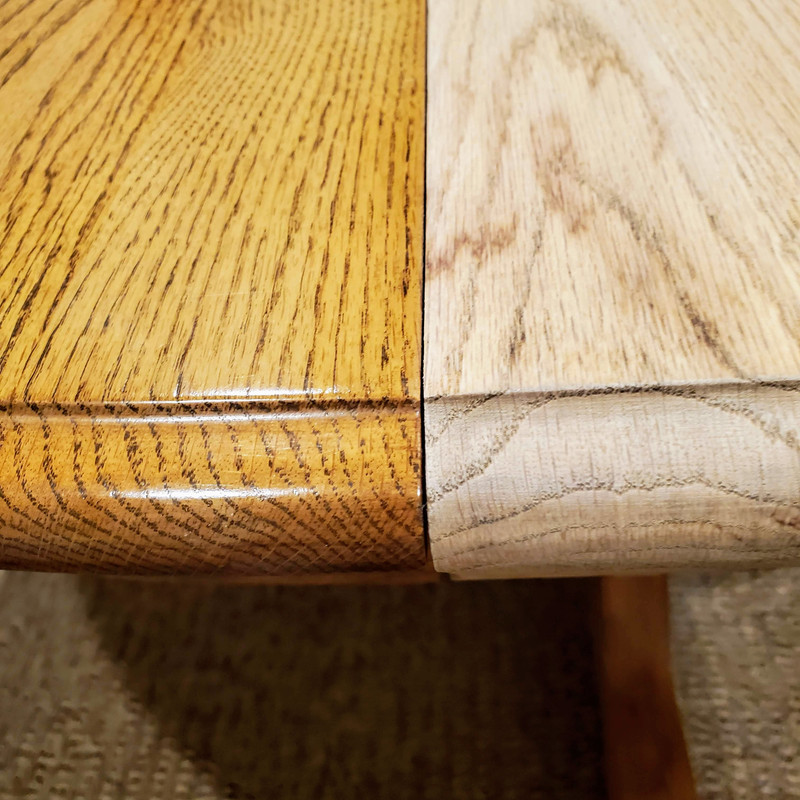
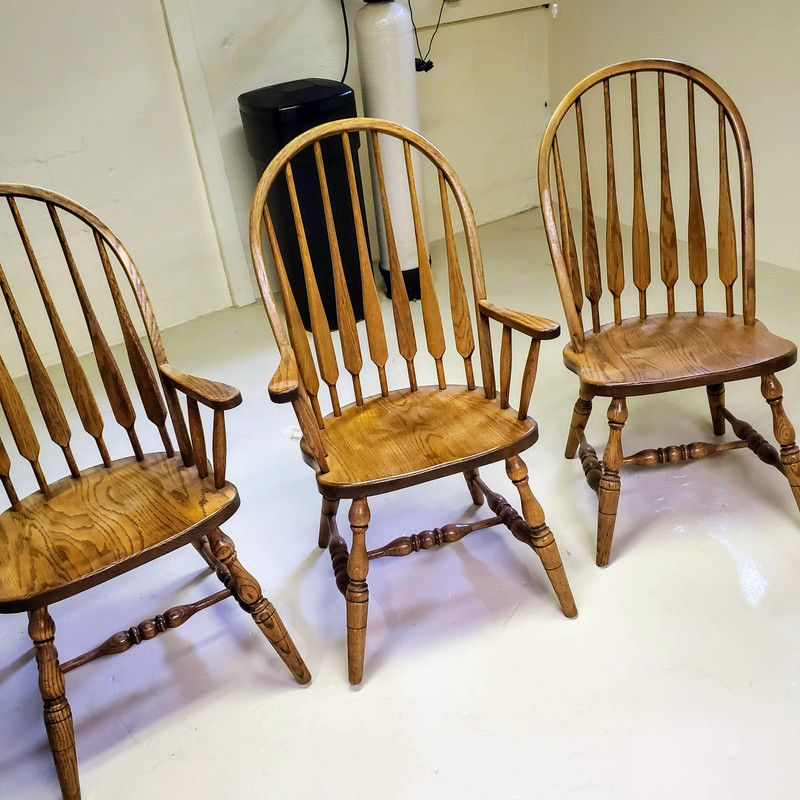
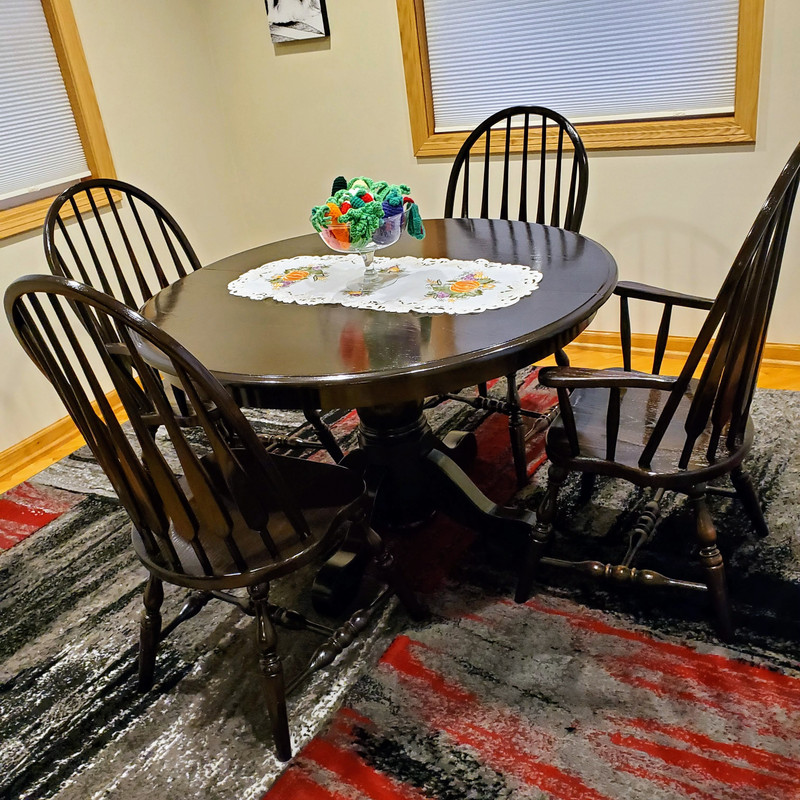
AFTER


 = new reply since forum marked as read
Highlight:
NoneDon't highlight anything
5 newestHighlight 5 most recent replies
= new reply since forum marked as read
Highlight:
NoneDon't highlight anything
5 newestHighlight 5 most recent replies

skylucy
(4,024 posts)

LuckyCharms
(22,821 posts)Walleye
(45,214 posts)

blueinredohio
(6,797 posts)Nice looking dining room set too!

BlueGreenLady
(2,888 posts)Job well done.

PJMcK
(25,090 posts)…I smoke weed when I do projects like yours!
Great job, by the way. Enjoy it!

AmBlue
(3,460 posts)Looks fantastic.


barbtries
(31,328 posts)are you sure you don't want to tackle a much loved but somewhat neglected Lane Cedar Chest?
i checked them out the other day and it seems that it would cost more to restore it than to replace it, but I can't replace it because it's my mother's hope chest and holds the family treasures.
LuckyCharms
(22,821 posts)I remodeled my entire kitchen myself and that took me 9 months. This took 17 months. The main problem was silicone contamination due to dusting it with Pledge for 30 years, as well as a minimum temperature required to use the products.
This set has extreme sentimental value and that's why I decided to tackle this.
Sentimental value means more than anything...it really does.
Maybe you can get by with just cleaning it up a bit? If not, weigh the sentimental value against the cost of having it restored and make your decision that way.
This project made me realize why it costs so much to restore and refinish furniture. Unless you know the tricks of the trade, the intensity of the labor is unbelievable, and you don't know what problems you are going to run into until you are well into the job.
If restoration is cost prohibitive, nothing wrong with leaving it as it is! 
barbtries
(31,328 posts)I am going to find someone who can fix the shelf. Still have all the parts, even the key. This chest has been through some hard times in the 50+ years I've been living a tumultuous life!
I'm in the process of going through it and attempting to organize all the ephemera within. That alone has been going on for about 2 years already.
LuckyCharms
(22,821 posts)barbtries
(31,328 posts)there is one metal part that may be twisted so i need a handyman who can manipulate or knows where to find a replacement. But all the wood is there, the bottom shelf is perfectly fine, so I know it can be fixed.
LuckyCharms
(22,821 posts)I know this is probably not what you are looking for, but just as an example.
https://www.rockler.com/cedar-chest-hinge-and-lid-support
Take a cruise around the site, and you may find the part you need!
Good luck with the cedar chest...I love the smell of cedar.
barbtries
(31,328 posts)I will. I don't even have a clue what to call the part. it's a metal thingamajig.
LuckyCharms
(22,821 posts)If you can take a good picture of the part, upload the pic to Google reverse image search, and Google will respond by showing you pictures of what it thinks it might be.
Then, if you see a Google result pic that looks like it might be the part, click on that pic and it will take you to the website where it found the similar picture, and go from there.
Good luck with it!
barbtries
(31,328 posts)I will do that. It would be good to be able to name the part, eh? lol

IbogaProject
(6,015 posts)Fyi
canuckledragger
(1,992 posts)Any kind of identifying marks like serial numbers or manufacturer's stamps go a long way in figuring out what it is, as you can type those directly into google too for leads.
Any pics you take can be taken to local experts too, as I've found there's always someone else more knowledgeable/familiar than I am in pretty much anything. Anything unique about it also helps to make whatever it is stand out, and narrow down the search sometimes.
barbtries
(31,328 posts)I'm not even sure the Lane company isn't still in business. I know the part is out there and once i know what to call it, I'll get and fix that shelf. I can at least get that done.
canuckledragger
(1,992 posts)For example, again from my PC repair background, I worked for a call center that was the customer troubleshooting line for Gateway computers.
We ran into a problem with folks looking for help for older model laptops that were under still warranty, but their batteries were dying and Gateway didn't offer them separate, especially for laptops they no longer sold.
One of the techs in our dept did some digging and found what was either the original manufacturer of those batteries, or an after market one that still made and sold those batteries to the public and we passed that info on to our callers. It's not info that the general public would know, especially if there's nothing on the battery itself saying who the original mfr was.
That's why I said it's worthwhile taking pic or something to local expert like an antiques dealer or something. You may find side avenues to explore...because you're not in the industry, etc. and you don't know what you don't know!
barbtries
(31,328 posts)i can't imagine it being too difficult to get the part, assuming it's even necessary - everyone had a Lane Cedar Chest in the 20th century,right?

Luciferous
(6,594 posts)
tblue37
(68,446 posts)SWBTATTReg
(26,355 posts)won't be able to top this (but I suspect that if you take up your tools again, you would).
Maybe take a break, and make some simple toys for kids, etc. that perhaps won't take too much work. That way, you're kind of chilling out a bit.
And I love your throw rug too!

OAITW r.2.0
(32,449 posts)Me, I smoke weed to focus on this level of detail.

Docreed2003
(18,714 posts)Hugh_Lebowski
(33,643 posts)For the record, I wouldn't like you any less if all you did was just get high and post bullshit all day 
Nor if you do exactly nothing from now on 
Karadeniz
(24,758 posts)
keithbvadu2
(40,915 posts)magicarpet
(19,102 posts)And there's Lassie waiting for Thanksgiving Day meal leftovers.
Nice rug too. Cozy room.

iluvtennis
(21,516 posts)
FirstLight
(15,771 posts)


But really...amazing work! I wish I had the oomph to do some of my projects around here. but the cold and my arthritis have been conspiring against me lol

rubbersole
(11,261 posts)Smoke all the weed and post all the horseshit you want if your work turns out like that. When you were growing up did your parents ever say "you need to calm down" ? Obviously a stoned overachiever. 🙂

ZZenith
(4,474 posts)Chocolate!
Looks gorgeous. Almost as gorgeous as the dog! 

ampm
(372 posts)That kind of workmanship is a work of art, and the refinishing of them is just beautiful

asiliveandbreathe
(8,203 posts)Like brand new..love the style..perfect choice of color..
Congratulations..
onecaliberal
(36,594 posts)republianmushroom
(22,531 posts)Nice work

airplaneman
(1,392 posts)
yankee87
(2,844 posts)It looks beautiful.
Had that dining room set earlier in my marriage.

druidity33
(6,927 posts)you've kicked it up a notch! Or two! Seriously, it hardly looks like the same table set. Nice work.

mountain grammy
(29,125 posts)Phoenix61
(18,871 posts)must be very, very special to you because that’s the only thing that could get me to even think about tackling it. As far as “never” I say that every time I finish some project around the house. Never seems to last more than a couple of months.
Gore1FL
(22,969 posts)I'm more of a "smoke weed and post nonsense and horseshit all day" type, myself.

panader0
(25,816 posts)Laffy Kat
(16,971 posts)I so admire your skill and dedication.


YoshidaYui
(45,570 posts)Indeed I do~ 🥌ed
MLAA
(19,782 posts) bluboid
(845 posts)
Pinback
(13,624 posts) 
PXR-5
(578 posts)Very nice 👍
mushroomhunter
(95 posts)and you keep a neat and clean house and work area. Spotless - not much time for weed .

Ilsa
(64,491 posts)The dark stain was a fabulous choice. 
upacreek
(15 posts)Rough start Nice finish. Ya gotta be smoking something to take the edge off during a long project. Hang in there.

debm55
(61,248 posts)very talented. I have a friend who goes to estate sales, Goodwill, etc, and finds pieces like this. He resales them. PS, I like your dog.
LuckyCharms
(22,821 posts)Formally trained for 3 years in trade school as a carpenter. Then I changed direction, went to university, and worked office jobs for the rest of my career.
Worst mistake I ever made. Should have stuck with my first love.
debm55
(61,248 posts)latter in life. My friend who does the woodworking works for UPMC in Pittsburgh. He hates it, will retire early in two years so he can go to flea markets and estate sales. You should see his house, He turned an eyesore into a wonderhouse. His gingerbread work alone is incredible. He does alot of drinking and I worry about him using the tools. Today, he showed me 4 chairs that he redid and the canework on the chairs. Lucky, follow your heart.

Solly Mack
(97,136 posts)58Sunliner
(6,377 posts)
niyad
(133,540 posts)You should be so proud of yourself.

JohnnyRingo
(20,962 posts)Could last a hundred years after we're gone.
Congrats!
highplainsdem
(62,786 posts)
3auld6phart
(1,683 posts)Brutiful workings. Is it Walnut table topping Definitely a family heirloom/ keepsake.:

Ferrets are Cool
(23,023 posts) Great work my friend. You should be proud!! Now, go post some more nonsense.
Onlyserious
(109 posts)And the rug really ties the room together!
Sienna86
(2,153 posts)It’s beautiful and I’d like to do same with my very similar table.
LuckyCharms
(22,821 posts)To be on the safe side, I would use this process (ie: shellac before staining), just in case you have silicone contamination from previously used dusting and cleaning products. You won't know you have the contamination until you put a coat of stain on, because the contamination is invisible until you put a coat of stain or a clear coat finish on.
1) Disassemble table. put all hardware in zip lock bags. Label the hardware, set aside.
2) Attempt to strip table components with a chemical stripper. Stupidly lay down a plastic tarp in your driveway. Spill stripper and mineral spirits on the plastic tarp and then walk in it. Slip and fall hard onto your driveway while your spouse cries and screams because she/he thinks you are dead because you don't move for a few minutes.
3) Give up on using a chemical stripper.
4) Sand off old finish to 150 grit. Do not go to a higher (ie: smoother) grit, especially if the piece is hardwood like oak or maple. Maybe jump up to 180 if the piece is softwood, but don't go to 220. You are going to be using gel stain, and you want to leave some "tooth" or slight roughness in the wood to give the gel something to adhere to. You can start with a lower (rougher) grit, and then move up to 150 or 180. Never go backwards in grits when sanding.
Start with a 5 inch random orbital sander. Let the sander do the work. Use a light touch. Take your time. Be careful. Set the sander to a lower speed and try not to tip it while sanding. You'll gouge the wood slightly, and won't see the gouge until you put your clearcoat on over the stain. Use a good light while sanding. Wear a mask.
Get off everything you can with the random orbital. Random orbitals will leave subtle swirl marks, so ALWAYS finish off by hand sanding in the direction of the grain. Now, you are left with the details to sand by hand. here's where it gets difficult.
Use whatever you can to sand the details.
Sanding mops attached to an electric drill or an angle grinder.
Contour sanders that you wrap sandpaper around.
Sanding sponges, etc.
When done sanding, inspect the pieces under a bright slight at eye level and fix whatever you missed. Remember that any error will be able to be seen from a mile away when you put your clear coat on.
Now, you want to seal in any potential silicone contamination with UNWAXED shellac. Do not use the yellow can shellac. This is waxed, and waxed will not work. So, either make your own unwaxed shellac by mixing unwaxed shellac flakes with denatured alcohol to a 2% mix, or buy Zinsser Seal Coat, which is 2% unwaxed shellac. It must be brushed on, don't spray it. Taklon brushes work the best.
Shellac dries extremely fast because it is alcohol based. Because it dries so fast, you will inevitably have dried drips. You'll need 3 coats of shellac. Sand in between each coat with 150 grit. Sand off the drips at this time. After sanding your third coat of shellac, you are ready to gel stain it.
Gel stain is not a penetrating stain like traditional Minwax stain is. Gel stain sits on the surface of the wood and acts as a colorant.
You can use gel stain like a traditional stain if you put a slip coat of mineral spirits on the piece first. However, your piece is now "finished" with the shellac you used to seal in potential contamination, so the staining process is different than just putting the stain on and wiping the excess off with a cloth. You are now staining a finished piece, so you use what is called a "dry brush" technique to remove the excess stain. Watch some videos online and practice the following technique on some scrap before attempting it.
Stir up the gel stain well to mix all of the pigment in with the polyurethane contained in the gel stain. Gel stain is very pigment rich, so you can get very dark and rich colors that are much more vibrant than a regular penetrating stain. Gel stain has the consistency of warm pudding. Stir it up good.
Apply the stain with a foam brush. Work fast. It gums up very quickly. Lay it on thick. Don't let the stain get ahead of you. Don't try to stain a large area all at once. Don't worry about going with the grain, etc. when applying the gel stain at this point. Just get it on the piece fast and thick.
Immediately begin removing the excess gel stain by using a dry brush technique, brushing in the same direction of the grain.. Get three natural bristle brushes. 1.5 inch, 3 inch, and then 4 or 5 inch. Soak a rag in mineral spirits and hold it in your non-dominant hand (you'll be using your dominant hand to work the brush).
Start with the smallest brush and work up to the large brush to remove and feather the stain. Put some music on. Literally dance as you dry brush. Remember, this stain tacks up very quickly, so you have to use a light hand and you have to use a lubricant (hence the rag soaked in mineral spirits). Starting with the smallest brush, stab just the tip of the bristles into the wet rag. Do not get too much mineral spirits on the brush, or else it will splatter onto the stain while you are brushing it. You just want to slightly lubricate the tips of the bristles. Work the stain, drag it out, play with it to get the look you want. Move very very quickly and keep stabbing your bristles into the soaked rag. Every time you stab the brush into the bunched up wet rag, you will discharge some of the excess stain into the rag.
Dance around the piece and work fast. Move up to the next largest brush and do the same thing. Light hand, good rhythm. Don't let the stain gum up. Keep feathering the stain.
You will be putting on 2 coats of gel stain. The first coat is going to look like total shit, and you will think you have failed. Don't worry about it, just make sure you didn't leave any globs of gel on the piece, or leave any drips. The second coat will make everything right.
Let the stain dry for a FULL WEEK. You will know it is dry and ready for the second coat when it does not feel cold or tacky when touching it with your knuckle. Or, take a cotton ball and press it against the stain. If no cotton sticks to the piece, it is probably dry and ready for the next coat. If you did not remove enough of the excess stain, it is possible that the gel stain will NEVER dry, and you'll have to remove it and start over. If you try to put on the next coat before the first coat is dry, the finish will fail.
Put the second coat on the same way as the first coat. Dry brush off the excess stain. You will be amazed at how much better the second coat looks. Let the second coat dry for a week at least.
Even though gel stain has polyurethane in it, you'll still want to put on a clear coat to protect the finish. There is not enough poly in the stain to protect it for a long period of time.
There are several clear coats, both oil based and water based. I never use water based, so I'll address an oil based clear coat.
I used a wipe-on product called Arm-R-Seal. It is a thinned polyurethane mixed with a finishing oil. The thinness of the product allows you to wipe it on. Use 3 or 4 coats. Follow product directions. put it on quickly, one or two swipes with a rag. Don't overwork it. Go with the grain whenever possible. Sand in between coats with a gray Scotchbrite pad, which is equivalent to 800 grit sandpaper. Sand lightly...you you just trying to sand off any dust nibs that settle on the finish while it was drying.
Have fun and good luck.
KPN
(17,473 posts)ever endeavor to take on a project like that. I do have a bay window seat (ponderosa pine) that needs restoration badly. It was stained and poly-urethaned finished when I installed it on an addition I did back in 89. It now had many scratches, small dents, has entirely lost its sheen and quite a bit of discoloration from sunlight through the glass and probably the pets getting up on it to enjoy the perch or see whats going on outside.
Anyway, I'm someday going to take a stab at it -- or just replace the whole window (have repaired some dry-rot on its exterior a couple of times so maybe that's the best solution). Restoration would really require an oxalic bleach/acid wash to try to get discoloration out and then steaming out the scratches and dents to the extent they can be, maybe some stained filler, and lots of gentle sanding before the stain and finish. Hmmm .... maybe I'll just paint it.
Once again, great job LC!

kooth
(239 posts)Great job! I noticed that your shop is squared-away as well!
kpete
(72,903 posts)Ligyron
(8,009 posts)Nice job, you're hired.
LuckyCharms
(22,821 posts)Much respect to you for having the patience to finish pieces.
I've done maybe 30 or 40 pieces over my lifetime, and never had any difficulty, until now. This made me realize how much I don't know about finishing furniture.
nightwing1240
(1,996 posts)Ebenezer lol
Response to LuckyCharms (Original post)
Chainfire This message was self-deleted by its author.
nightwing1240
(1,996 posts)Great job on that now lean back and fire up a doobie lol

Harker
(18,018 posts)That's nice work, Lucky!
Orrex
(67,306 posts)Love it!
OMGWTF
(5,189 posts)I find that God’s flowers help me deal with tedious tasks much better.
twodogsbarking
(19,152 posts)certainot
(9,090 posts)
ratchiweenie
(8,228 posts)
malthaussen
(18,601 posts)
sellitman
(11,748 posts)That's top shelf work.
Cute dog too!!!

Niagara
(11,932 posts)Your work is freaking amazing!!
Your wife is extremely lucky (no pun intended?) to have such an amazing, talented and industrious husband!!!
Your sheltie is adorable!!!!
KY_EnviroGuy
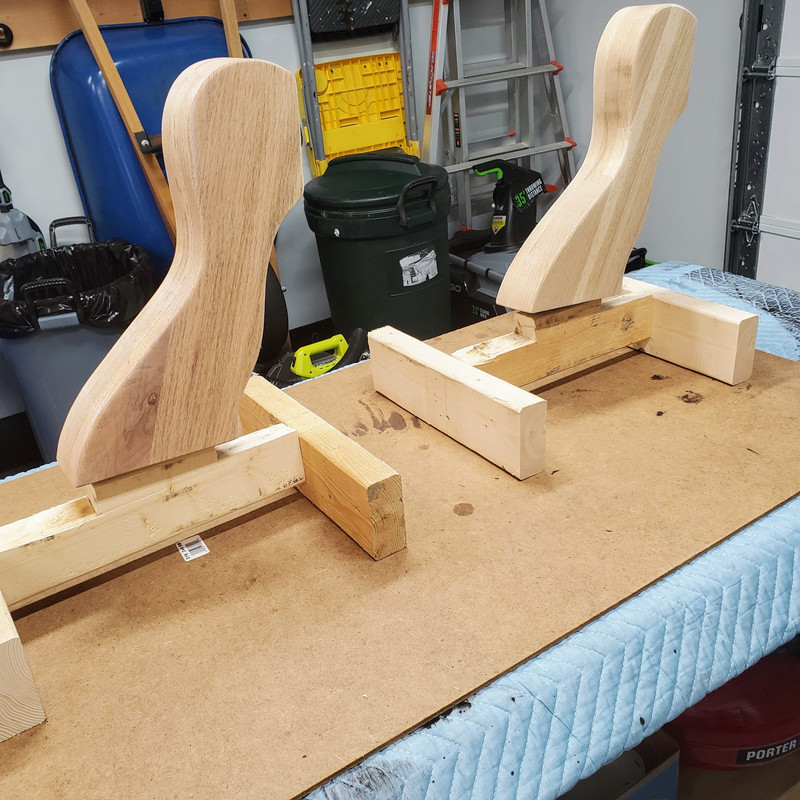
(14,793 posts)Great job you've done, congratulations. Good idea you had in jigging those foot pieces. I can relate to your pain, as a seemingly simple job like that can be a nightmare of cleaning up messes, oh-shits, correcting mistakes and many trips for materials forgotten.
I have an almost identical set although none of my chairs have armrests. It's been so long I can't recall where it was purchased but shocked this morning to see made-in-China bar code stickers underneath. It replaced our original 1965 Formica-topped set with steel legs & aluminum trim that was also my college study desk and often turned into a workbench......
Thanks for the nice set of pix and for posting details of your refinish process....
KY.......

BadGimp
(4,109 posts)eom
Pepsidog
(6,365 posts)
Nevilledog
(55,111 posts)Fantastic results for a pothead shitposter!


CaptainTruth
(8,236 posts)I used to have a table exactly like that, I bought it used from a neighbor.
The neighbor had a floor refinishing business, mostly oak or pine floors, & he got the table from one of his customers, I believe they gave it to him. It was in great shape except for the top, which was scratched up & needed to be refinished.
Since he was in the floor refinishing business, he took the top off the table, laid it on his driveway, & used his floor sander (the kind with the big round rotating disk) to sand the finish off the top. That took all of about 3 minutes with a big floor sander. Then a fine sanding, then clear floor finish & buffing (with the floor sander of course) to a mirror finish.
It was beautiful when it was done & I gladly bought it from him.
orangecrush
(30,763 posts)Great job, Lucky!
Now I'm sending you some antique wood cabinet tube radios to refinish.
I want them done yesterday.


reACTIONary
(7,261 posts)... smoking weed and posting horseshit? Great job of multitasking!

IcyPeas
(25,669 posts)(and what is in that bowl?)
LuckyCharms
(22,821 posts)fake vegetables. I think they're knitted. Found them in my M-I-L's house after she passed.
They're so weird looking that they're beautiful. 
lillypaddle
(9,606 posts)Such craftmanship.