Welcome to DU!
The truly grassroots left-of-center political community where regular people, not algorithms, drive the discussions and set the standards.
Join the community:
Create a free account
Support DU (and get rid of ads!):
Become a Star Member
Latest Breaking News
Editorials & Other Articles
General Discussion
The DU Lounge
All Forums
Issue Forums
Culture Forums
Alliance Forums
Region Forums
Support Forums
Help & Search
Cooking & Baking
Related: About this forumDinner Pies 3: Empanadas, Samosas & Colcannon!! 🌞
Tempeh & Brown Rice Empanadas
Here is a meatless take on empanadas featuring tempeh,
a meat-like surrogate made from fermented soybeans.
When the tempeh is simmered it becomes tender and porous,
making it a good vehicle for other flavors and giving it the
ability to mimic things like, well, traditional empanada filling.
The brown rice adds bulk and whole grain goodness. Even
hardcore carnivores, I’d wager, will be amazed at how much
these taste like beef empanadas. (Email me and let me know
if you agree.) If you’d rather use a different pastry than the one I
recommend, the Whole Wheat Pie Dough ([>]) will give these
an even more wholesome profile; see Recipe for Success.
MAKES 12 APPETIZER PORTIONS
1 recipe **Flaky and Sturdy Hand Pie Pastry, divided as instructed in step 1 and refrigerated
FILLING
1 tablespoon soy sauce
8 ounces tempeh, cut into ½-inch dice
3 tablespoons vegetable oil
½ large onion, finely chopped
½ cup finely chopped red or green bell pepper
2 garlic cloves, minced
1¼ teaspoons chili powder
½ teaspoon smoked paprika
½ teaspoon ground cumin
⅔ cup tomato sauce
1 tablespoon barbecue sauce
1 cup cooked brown rice or other plain rice
3 tablespoons finely chopped pickled jalapeño peppers, plus a little of the jar juice if needed
¼ cup chopped fresh flat-leaf parsley
1 cup grated sharp cheddar cheese (optional)
1 egg beaten with 1 tablespoon milk
1. Prepare the pastry, but divide it into twelve equal-size pieces
instead of four. Shape them into balls, then flatten into disks
not quite ½ inch thick. Place on a small baking sheet lined with
plastic wrap; press another sheet of plastic wrap over them,
covering tightly. Refrigerate for at least 1½ to 2 hours.
2. Pour 1¼ cups water into a medium-size saucepan and stir
in the soy sauce. Add the tempeh and bring the water to a
simmer over medium high heat. Reduce the heat, cover, and
simmer the tempeh for 10 minutes. Drain, then transfer the
tempeh to a plate to cool.
3. Heat the oil in a medium-size skillet over medium heat.
Add the onion and bell pepper and sauté for 6 to 7 minutes,
then stir in the garlic, chili powder, smoked paprika, and
cumin. Cook, stirring, for another 30 seconds, then stir in
the tomato sauce and barbecue sauce. Remove from the
heat and set aside.
4. Transfer the cooled tempeh to a food processor. Pulse
the machine until the tempeh is well chopped, but don’t
overdo it; you want the texture to be granular, not gummy.
Transfer the tempeh to a mixing bowl and add the brown
rice and chopped jalapeños. Add the sauce mixture and the
parsley. Mix lightly, just until combined, adding salt and
pepper to taste. If you like the flavor and want some
additional moisture, add a few teaspoons of the pickled
jalapeño juice. Set aside for 15 minutes.
5. Preheat the oven to 350°F.
6. Remove the plastic wrap covering the dough, but leave the
baking sheet in the refrigerator. Working with one piece of
dough at a time, roll it on a lightly floured surface into a thin
oblong 5½ to 6 inches long and about 4 inches wide. Draw
an imaginary line across the center—widthwise—and place a
mound of the tempeh filling just to one side of it; leave a ½-inch
border all around the filling. Top with a tablespoon of grated
cheese, if you like; press down gently to even it out.
7. Using a damp fingertip, moisten the entire perimeter of the
dough. Fold the uncovered portion of the dough over the
covered half. Line up the edges of the pastry and press them
together; crimp with a fork. Place the empanada back in the
refrigerator on the plastic wrap-lined baking sheet.
Repeat for the remaining empanadas.
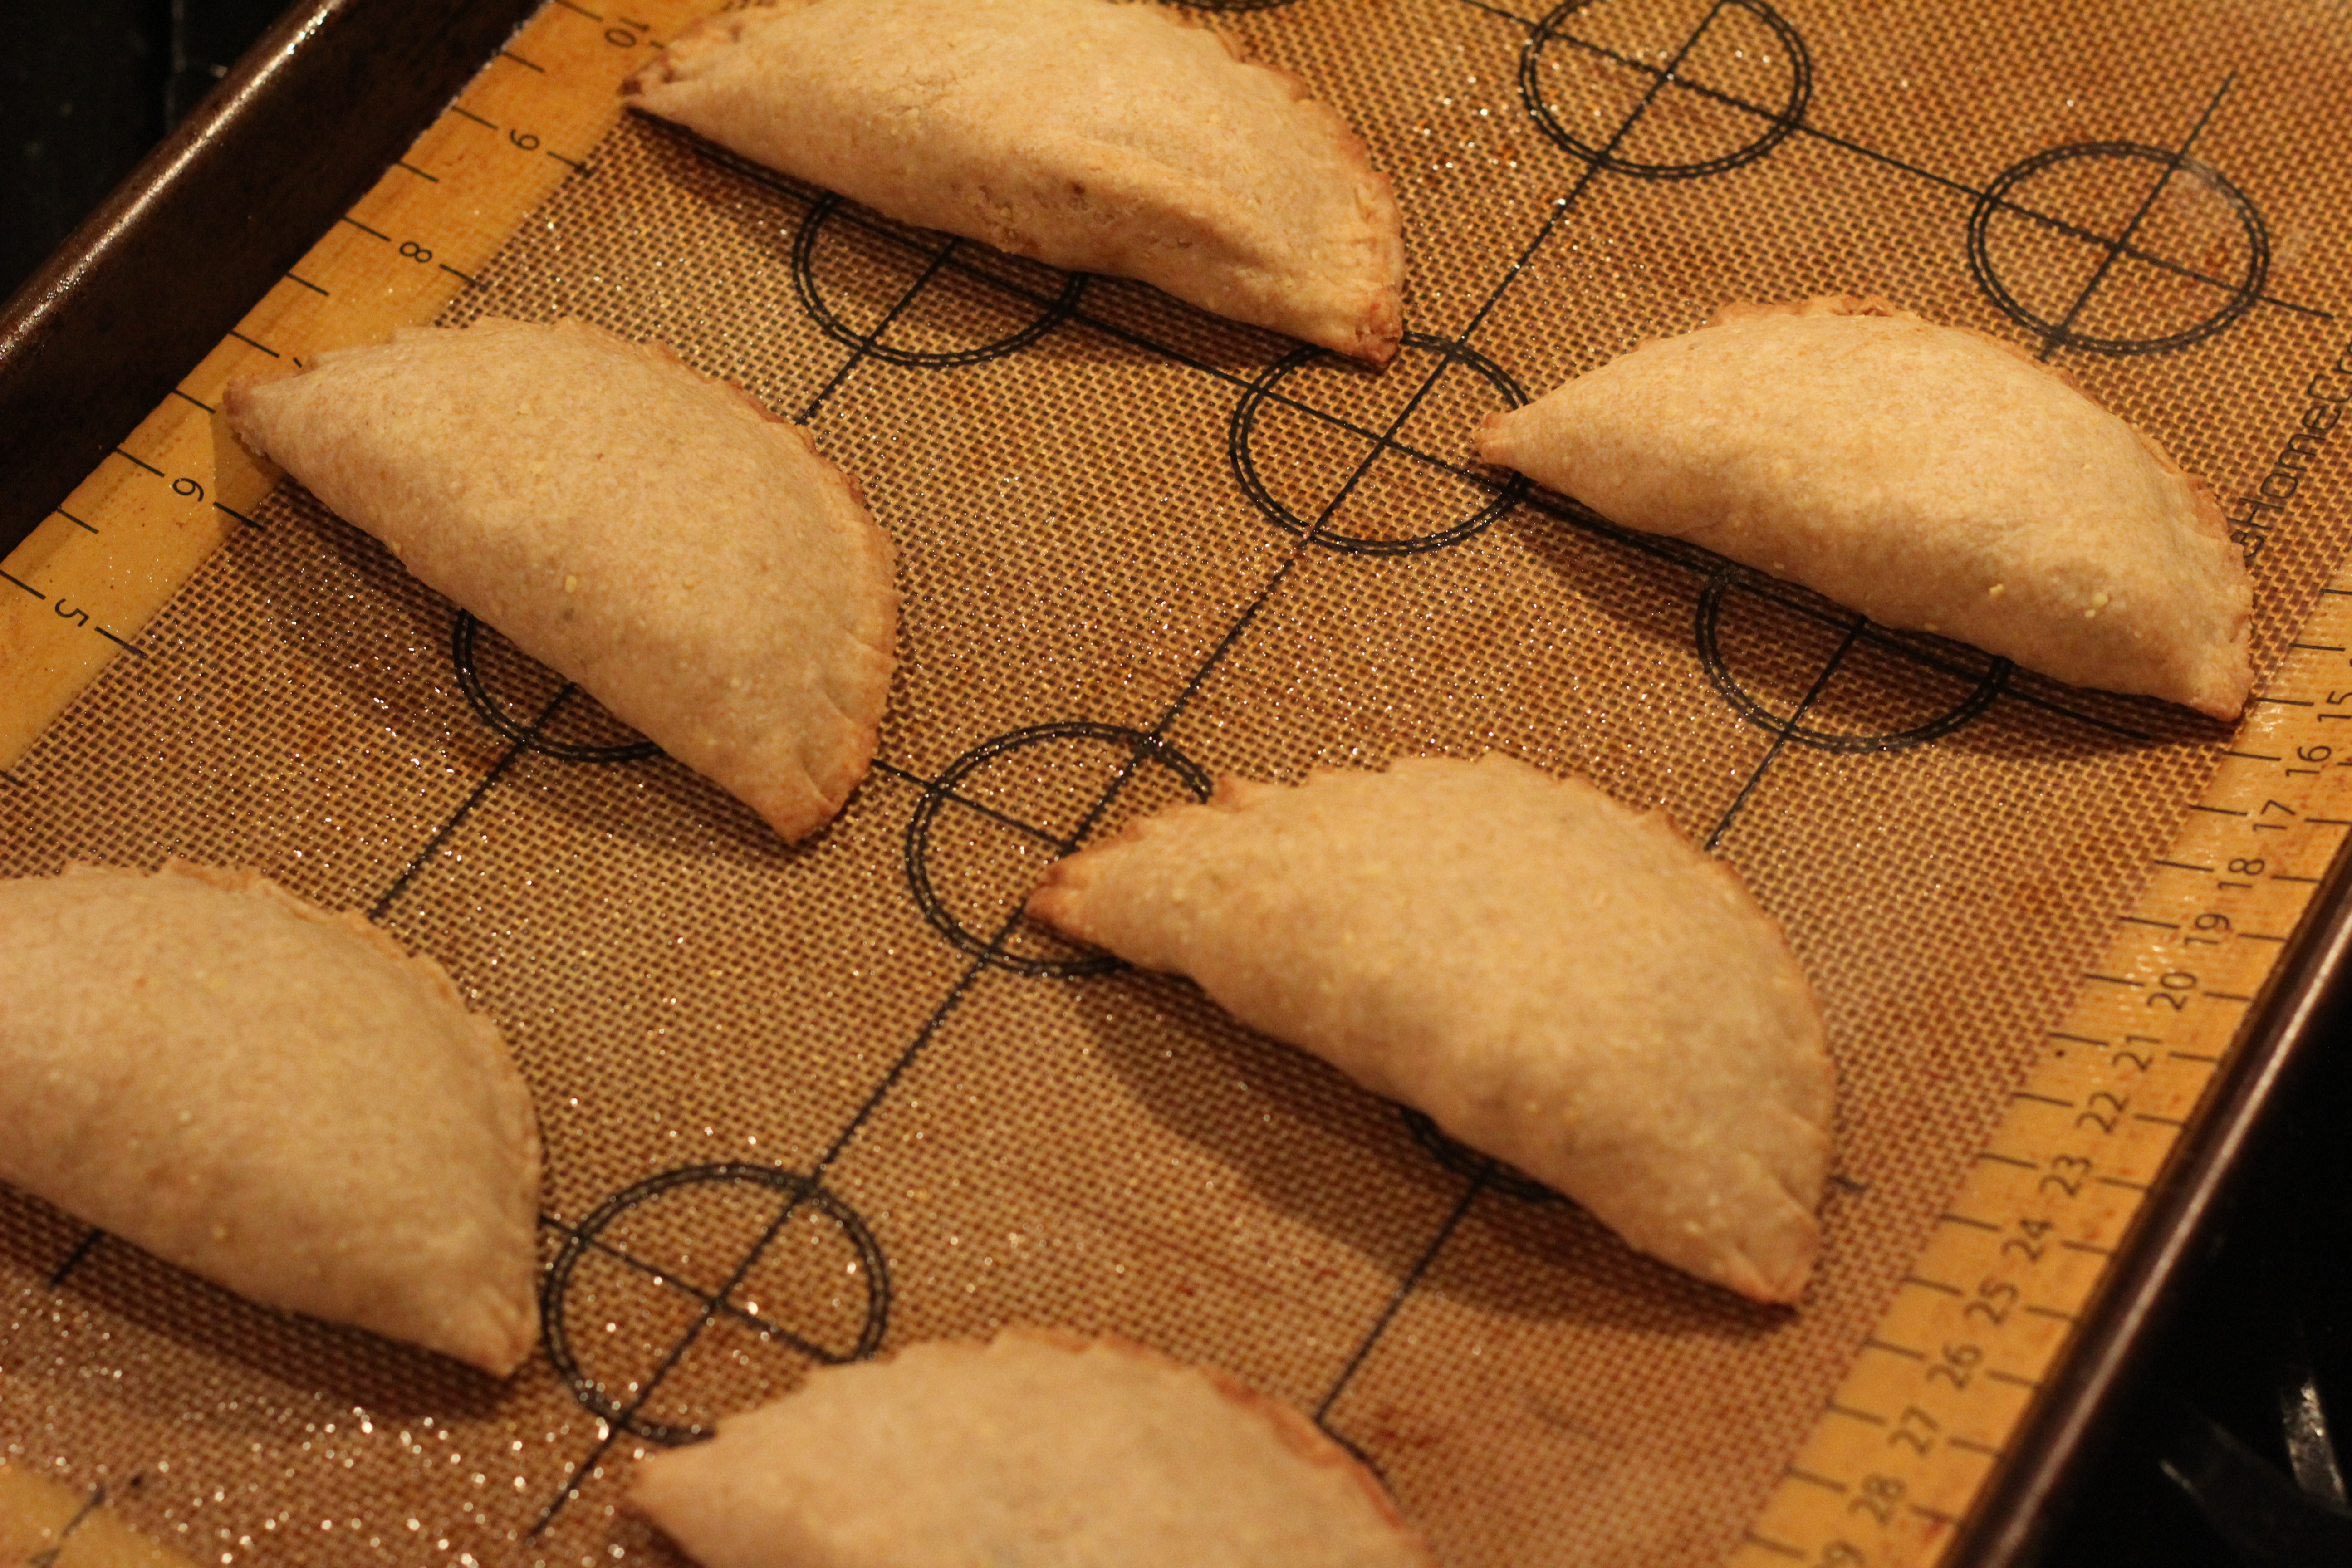
8. Transfer the chilled empanadas to a large baking sheet
lined with parchment; poke the tops once with a fork to
create steam vents, then brush very lightly with the egg
wash. Bake on the center oven rack until golden brown,
about 30 minutes. Transfer the empanadas to a rack and
cool for at least 15 minutes before serving.
RECIPE FOR SUCCESS
Back in the day (the 1970s), when I first started using
tempeh, I don’t think it was common practice to simmer
it first. It seems to be nowadays, however, and I think it’s
a good idea. I was initially concerned that simmering the
tempeh would cause it to fall apart, but that’s not the case.
It remains solid, but still manages to soften up. Try it.
If you’re using the Whole Wheat Pie Dough, the easiest thing
to do is roll out the entire dough and simply cut it with a 3½-inch
round cutter. Keep the cuts close together. The empanadas will
be a little smaller, good for party-size appetizers.
**Flaky & Sturdy Hand Pie Pastry
I’ve been making hand pies for many years and I’ve yet to run
across a crust recipe that’s as reliable or easy to prepare as
this one is. The first thing you’ll notice is that the proportion
of fat to flour is quite a bit less than your typical pie or tart
pastry; that accounts for the “sturdy” part of the recipe title,
sturdy being a desirable quality in the handheld dinner pies
we use this for. But it’s also flaky as all get out. The crust
fractures into these lovely, large shards that will make you
swoon. This pastry is so good, I use it for virtually all of my
hand pies, and I almost always make it in the food processor.
(If you prefer to make it by hand, see the Note.)
MAKES ENOUGH FOR 4 MEDIUM-SIZE HAND PIES OR MORE SMALLER ONES
6 tablespoons (%4 stick) cold unsalted butter, cut into ‘inch cubes
2 tablespoons cold vegetable shortening, cut into ¥4-inch cubes
2 1/4 cups all-purpose flour
1/4 teaspoons salt
1 large egg
1/3 cup cold water
1 tablespoon white vinegar
Put the butter and shortening cubes in a single layer on a
flour-dusted plate, with the shortening off to one side of
the plate by itself. Refrigerate for at least 30 minutes.
Combine the flour and salt in a bowl and refrigerate that
as well. Gently whisk the egg, water, and vinegar in a
1-cup glass measure until combined and refrigerate that
also.
When you’re ready to mix the pastry, transfer the flour
mixture to a food processor. Pulse several times to mix.
Remove the lid and add the fat all at once, dropping it here
and there over the flour. Give the machine six to eight 1-
second pulses, cutting the fat into small pieces (baby pea-
size and smaller).
Remove the lid and pour about half of the liquid over the
dry ingredients, but not all in one place. Give the machine
two or three half-second pulses. Remove the lid, add the
rest of the liquid, and pulse the machine again until the
dough just barely starts to form coarse crumbs that hold
together when you press them between your fingertips.
Dump the mixture into a large mixing bowl and gather it
together, kneading it gently several times.
4. Turn the dough out onto a floured surface and divide
it into four equal pieces. Knead each one a couple more
times, then shape into balls. Put the balls on separate
sheets of plastic wrap and flatten them into disks about
1/2 inch thick. Wrap individually in the plastic and
refrigerate for 1 to 2 hours before rolling, or longer if
desired. (You can also slip the wrapped dough into a
gallon-size plastic freezer bag and freeze it for up to 2
months. Thaw overnight in the refrigerator before using.)
NOTE: To make the dough by hand, measure and
refrigerate all of the ingredients as specified in step 1.
When you're ready to mix the dough, transfer the dry
mixture to a large mixing bowl. Add the fat; toss by hand
to coat with the flour. Using a pastry blender, cut in the fat
until it is broken into small pieces (baby pea-size and smaller).
Push the mixture toward the center of the bowl. Add about
half of the liquid, pouring it all around the sides of the
bowl rather than in any one spot. Stir briskly with a fork to
dampen everything. Add the remaining liquid and mix again
until the dough pulls together. Knead, divide, and shape as
specified in step 4.
RECIPE FOR SUCCESS
The reason we flour the plate and scatter the fat around on
it (instead of dumping it in a pile) is simply to prevent the fat
from sticking to the plate or itself; the flour acts as a release
surface. Keeping the fat in separate pieces also facilitates even
mixing. Just so you know, this dough feels a little moister to
the touch than the Go-To Pie Dough and others you may have
made. That’s just the way it is.
*********************************************************************

Potato & Pea Samosas
These are the spicy triangular turnovers most of us know and love
from Indian restaurants. I don’t usually make deep-fried dishes at
home, but I make an exception for these exotic little pastries
because they’re just so good. Surprisingly easy to make, also.
Serve with your favorite sweet and sour chutney on the side.
MAKES 16 APPETIZER PORTIONS
1 recipe **Samosa Dough
FILLING
1 pound russet or red-skinned potatoes (1 large or 3 to 4 medium-small
potatoes), peeled and cut into ¼-inch dice
¾ cup frozen peas (no need to thaw)
2 tablespoons vegetable oil
½ large onion, finely chopped
1½ teaspoons minced fresh ginger
1½ teaspoons garam masala
1 teaspoon chili powder
½ teaspoon ground coriander
½ teaspoon ground turmeric
2 teaspoons fresh lemon juice plus 2 tablespoons water
3 tablespoons finely chopped fresh flat-leaf parsley or cilantro
Several cups of vegetable oil, for deep-frying
1. If you haven’t already, prepare the dough and set it aside, wrapped
in plastic wrap.
2. Put the potatoes in a saucepan and add enough salted water to
cover by an inch or so. Bring to a boil over high heat, then boil the
potatoes for 5 to 6 minutes. Add the peas and boil until the potatoes
are just tender, 4 to 5 minutes more. Drain the potatoes and peas in
a colander and set aside to cool.
3. Heat the vegetable oil in a large skillet over medium heat. Add
the onion and sauté for 6 to 7 minutes. Stir in the ginger, garam
masala, chili powder, coriander, and turmeric. Cook gently for 30
seconds, stirring, then stir in the potatoes and peas. Stir lightly,
coating everything well with the seasonings, then mix in the lemon
juice-water mixture, the parsley, and salt to taste. Remove from the
heat, transfer to a plate, and cool. Taste again, adding more salt as
needed.
4. To assemble the samosas, divide the dough into eight equal
pieces and shape them into balls. Place them on a sheet of
plastic wrap and cover them with another sheet of plastic wrap.
Lay out a third sheet of plastic wrap for your finished samosas.
Working with one piece of dough at a time and keeping the rest
covered, roll the dough into a circle 6½ inches in diameter on a
lightly floured surface. Cut the dough circle in half.Using a wet
fingertip, moisten the very edge of the straight side of one half.
Fold this semicircle in half, lining up the straight edges, and press
just the edges to seal. You will have formed a cone.
5. Cup the cone in one of your hands and spoon some of the filling
into the cone, enough to nearly fill it but not so much that you can’t
seal it closed; see Recipe for Success. Moisten the exposed inside
edges of the cone and press them together to seal. Set aside on
the plastic wrap. Repeat, first for the other semicircle and then for
the remaining pieces of dough.
6. When you’re ready to fry the samosas, heat about 3 inches of
oil to 350°F in a large saucepan. Line a baking sheet with paper
towels. When the oil is hot, add about 4 samosas at a time to the
oil—they should not be crowded—and deep-fry until golden brown,
5 to 7 minutes. Transfer to the paper towels as they come out of
the fat. Cool for several minutes before serving.
RECIPE FOR SUCCESS
The deep-fried pastry around the filling tends to mute the
seasoning in the filling, so don’t use a light hand with the
herbs, spices, or salt. If you have fresh mint on hand,
adding a finely chopped tablespoon will make the filling
sparkle even more.
This is one of those times when you’ll be tempted to overfill
the pastry so you have plenty of filling in each one. If you do,
you’ll find that there’s not enough of a border left to create a
good seal, and oil will seep into the samosas—or they may
break apart.
**Samosa Dough
Samosas are little Indian appetizer pastries, commonly made
with potatoes, and seasoned with curry spices. This simple-
to-prepare dough, modeled on a recipe by Indian cookbook
author Julie Sahni, is what they’re wrapped in. It has less fat
and more liquid than other pastry doughs, and is kneaded
briefly to give it some strength and durability for deep-frying.
MAKES ENOUGH FOR 16 SAMOSAS
1¼ cups all-purpose flour
½ teaspoon salt
⅛ teaspoon baking soda
4 tablespoons cold vegetable shortening, cut into ½-inch cubes
¼ cup water blended with 2 tablespoons plain yogurt or sour cream
1. Combine the flour, salt, and baking soda in a mixing bowl,
one large enough to get your hands in. Mix with a whisk.
Add the pieces of vegetable shortening and toss gently by
hand to coat with flour. Gently rub the fat and flour together
until well combined.
2. When all the fat is broken up, sprinkle about half of the
liquid over the mixture and work the mixture with a large
fork to combine. Continue to add liquid, a couple of
teaspoons at a time, until the dough gathers together in
a single mass. You may not need all of the liquid for the
dough to cohere.
3. Turn the dough out onto a lightly floured surface and
knead for 3 to 5 minutes, until smooth and supple. Shape
into an 8-inch-long log, wrap in plastic wrap, and let rest
at room temperature for 15 minutes before using. If you
aren’t making your samosas right away, go ahead and
refrigerate the dough until needed.
********************************************************************

Colcannon Pie
If you’re a fan of colcannon—that hearty Irish dish of creamy
mashed potatoes mixed with cooked greens—you’ll love this
pie. Of course, some might say that piling the goods into a
buttery pastry is stretching the point, but they would, of
course, be mistaken: The pastry transforms what we would
typically consider a side dish into a main dish to be reckoned
with. (A little leftover sauced beef or chicken on the side is
perfect.) This recipe is written around braised cabbage,
sandwiched between layers of mashed potatoes, but it’s
equally good made with fresh kale; see Recipe for Success.
MAKES 6 TO 8 SERVINGS
1 recipe **Go-To Pie Dough, refrigerated
FILLING
1 to 2 tablespoons vegetable oil
4 slices bacon, cut into ½-inch pieces
1 cup finely chopped onion
8 cups thinly sliced green cabbage
1 cup chicken broth
2 large baking potatoes (1½ to 1¾ pounds total), peeled and cut into chunks
½ cup whole milk
¼ cup sour cream
4 tablespoons (½ stick) unsalted butter, cut into several pieces
1½ cups grated sharp or extra-sharp cheddar cheese
1. If you haven’t already, prepare the pastry and refrigerate it for at
least 1½ hours.
2. On a lightly floured sheet of wax paper, roll the dough into a
circle 13 to 13½ inches in diameter. Invert the pastry over a 9½-
inch deep-dish pie pan, center it, then peel off the paper. Gently
tuck the pastry into the pan without stretching it, then sculpt
the edge into an upstanding ridge. Flute the ridge, if desired.
Refrigerate the shell for at least 1 hour, then partially prebake
and cool according to the directions on. Preheat the oven to
350°F.
3. Heat the oil in a very large skillet over medium heat. Add the
bacon and cook until much of the fat is rendered and the
bacon is starting to crisp. Stir in the onion, sauté for 2 to 3
minutes, and then add the cabbage. (If your skillet isn’t quite
large enough to hold all of it, add half of the cabbage first, then
cook it down a bit before adding the rest.) Lightly salt and
pepper to taste.
4. When all of the cabbage has started to wilt, add ½ cup of
the chicken broth. Cover and braise the cabbage for 7 to 10
minutes. Add the remaining ½ cup broth, then cover the skillet
again and continue to cook until the cabbage is good and tender,
about 10 minutes more. You want the cabbage to be damp, but
not overly wet. Uncover for the last few minutes if you need to
boil off some liquid. Set aside.
5. Put the potatoes in a large saucepan with plenty of salted
water to cover. Bring to a boil over high heat, reduce the heat,
and boil gently until the potatoes are tender, about 10 minutes.
Drain, reserving the liquid.
6. Put the milk, sour cream, and butter in the still-hot saucepan.
Let them warm for a minute, then return the drained potatoes
to the pan. Mash well with a hand masher, adding a little of the
potato water if needed; the ideal texture is neither too loose nor
too firm, but right in the middle. (Use the rest of the potato
water for soup stock, if you like.) Mix in salt and pepper to taste,
then stir in 1 cup of the cheddar cheese.
7. To assemble the pie, spread about one-third of the mashed
potatoes evenly in the pie shell. Pile the cabbage on top,
spreading it around. Top with the remaining mashed potatoes.
Sprinkle the remaining ½ cup cheese on top. Bake on the
center oven rack for 30 minutes. Since everything is already
cooked, there will be few visual clues of significance. You’re
simply baking the crust to golden perfection.
RECIPE FOR SUCCESS
Kale is often used in place of cabbage in the traditional
version of colcannon. It can be used here, as well, with
some adjustments. First, unlike cabbage, fresh kale
should be meticulously washed. Agitate the leaves in
plenty of water to remove grit and dirt. Tear the leaves
from the stems and chop well, discarding the stems.
(You’ll need 8 cups tightly packed leaves.) Sauté the
onion and bacon as instructed, but you’ll need more
broth to steam-cook the kale until it is tender. Add 2
cups broth and simmer the kale—tightly covered—until
it is tender, 20 to 30 minutes.
Keep at least ¼ inch of broth in the pan at all times.
When the kale is done, lift it out with tongs and save
the liquid in the pan for soup stock. Proceed with
the assembly, using the kale as you would the
cabbage. If you’re looking for a slightly fancier
presentation, use a 10-inch tart pan instead of a
deep-dish pie pan.
**Go-To Pie Dough
It’s no mystery why I call this my “go-to” dough: It’s so
versatile that I use it for perhaps four out of every five
of the savory (and sweet) pies that I make. You can’t
beat it for reliability, and it bakes up to a beautiful
texture, perfectly balanced between flaky and short.
This is the single crust recipe; the double crust version
follows. The recipe calls for a food processor; to make the
dough by hand, see the Note.
MAKES ENOUGH FOR 1 (9½-INCH) PIE OR TART SHELL
8 tablespoons (1 stick) cold unsalted butter plus 2 tablespoons cold
vegetable shortening (or 10 tablespoons cold unsalted butter), cut
into ½-inch cubes
1½ cups all-purpose flour
1½ teaspoons cornstarch
½ teaspoon salt
2 teaspoons white vinegar
Scant ⅓ cup cold water
1. Put the butter and shortening cubes in a single layer on a
flour-dusted plate, with the shortening off to one side of the
plate by itself. Refrigerate for at least 30 minutes. Combine
the flour, cornstarch, and salt in a bowl and refrigerate that
mixture also. Pour the vinegar into a 1-cup glass measure.
Add enough cold water to equal ⅓ cup liquid. Refrigerate.
2. When you’re ready to mix the pastry, transfer the flour
mixture to a food processor. Pulse several times to mix.
Remove the lid and scatter about 6 tablespoons of the
butter—a little more than half of the total fat—over the
dry mixture. Pulse the machine five times—that’s five 1-
second pulses—followed by an uninterrupted 5-second
run. Remove the lid and add the remaining fat. Give the
machine six or seven 1-second pulses.
3. Remove the lid and loosen the mixture with a big fork;
you’ll have a range of fat clods, most quite small but a
few larger ones as well. With the lid off, drizzle about
half of the liquid over the mixture. Replace the lid and
give the machine three very quick, half-second pulses.
Remove the lid, loosen the mixture with your fork, and
add the rest of the liquid. Pulse briefly three or four times,
just like before. The mixture will still look crumbly, but the
crumbs will be starting to get a little clumpier.
4. Transfer the contents of your processor to a large bowl,
one large enough to get your hands in. Start rubbing the
crumbs together, as if you were making a streusel topping—
what you’re doing is redistributing the butter and moisture
without overworking the dough. (Note: If your dough mixture
came out of the food processor more clumpy than crumblike,
don’t worry. Just pack it together like a snowball, knead it very
gently two or three times, and proceed to step 5.) You can
accomplish the same thing by “smearing” the crumbs down
the sides of the bowl with your fingers. When the dough starts
to gather in large clumps, pack it like a snowball and knead
gently, three or four times, on a lightly floured surface.
5. Put the dough on a long piece of plastic wrap and flatten it
into a 1-inch thick disk. Wrap tightly in plastic wrap and
refrigerate for at least 1½ to 2 hours; overnight is fine. (You
can also slip the wrapped dough into a gallon-size plastic
freezer bag and freeze it for up to 2 months. Thaw overnight
in the refrigerator before using.)
NOTE:
To make the dough by hand, chill all of your ingredients as
specified in step 1, but increase the flour to 1½ cups plus
1½ tablespoons.
Remove the butter and shortening from the refrigerator 5 to
8 minutes before mixing; it should have a little “give” to it
when squeezed between your fingers. Add about 6
tablespoons of the butter to your dry mixture; toss to coat
with flour Using your pastry blender, cut in the butter until
the largest pieces of fat are pea-size. Add the remaining
fat, toss to coat, and cut that in.
The entire mixture should look like it has been “touched” by
the fat, and nothing should be larger than pea-size. Pour
half of your liquid down around the sides of the bowl, but
not in any one spot. Mix well with a large fork, moving the
mixture in from the sides and up from the bottom. Repeat
with the remaining liquid, but add the last few teaspoons
only if needed. Rub and smear the crumbs as specified in
step 4 until a dough starts to form. Pack the dough and knead
gently a couple of times. Flatten into a disk, then wrap and
refrigerate.
RECIPE FOR SUCCESS
In case you’re wondering why there’s vinegar here and in some
of the other pastry recipes, it’s because vinegar is an acid, and
acids tenderize things made with wheat flour. That’s why sour
cream pancakes and buttermilk biscuits have that melt-in-your-
mouth softness. Don’t worry: You won’t taste the vinegar in the
finished crust.
All the above from "Dinner Pies"
https://www.goodreads.com/book/show/24611149-dinner-pies
Savoury! (Personally I love Samosas!
 ) Enjoy Everyone!

1 replies
 = new reply since forum marked as read
Highlight:
NoneDon't highlight anything
5 newestHighlight 5 most recent replies
= new reply since forum marked as read
Highlight:
NoneDon't highlight anything
5 newestHighlight 5 most recent replies
= new reply since forum marked as read
Highlight:
NoneDon't highlight anything
5 newestHighlight 5 most recent replies
Dinner Pies 3: Empanadas, Samosas & Colcannon!! 🌞 (Original Post)
justaprogressive
Dec 2025
OP
Response to justaprogressive (Original post)
jfz9580m This message was self-deleted by its author.